Home > TrackWrench® > Manual Torque Wrenches > Market segments > Piping-Flanges
Piping-Flanges
Flange connections are subject to increasing demands in terms of safety and leakage. The supplier of the gaskets, among other things, often indicates what the tightening torques of the bolts should be. In addition, there is often a clear instruction in which way and sequence the bolts should be tightened.
Align
- Bring flanges and bolt holes together without using excessive force.
- Slide gasket between flanges and center gasket.
Please note the following
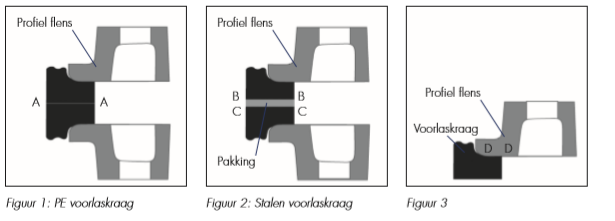
- When using a rubber gasket, the sealing faces of the two pre-weld collars should contact the gasket parallel to each other over the entire circumference (see lines A–A, B–B, C–C in Figures 1 and 2).
- The flange face D–D (see Figure 3) should fit all around with the collar of the weld collar to prevent tipping over the entire surface. This can lead to leakage and breakage when tightening the bolts.
Tightening bolts in 7 steps
- Install all bolts and nuts finger tight and align as per figures 1, 2 and 3.
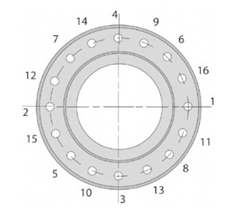
- Tighten bolts with a torque wrench in a criss-cross pattern as shown in Figure 4 with 20% of the torque shown in the table below.
- Repeat with 40% of the tightening torque.
- Repeat with 60% of the tightening torque.
- Repeat with 80% of the tightening torque.
- Repeat with 100% of the tightening torque.
- Tighten the bolts all around until all bolts are tight with the full tightening torque (generally 2x all around).
This applies to bolted connections that are subjected to extreme thermal cycling.


